Showing posts with label valentine's day. Show all posts

Thursday, February 14, 2013

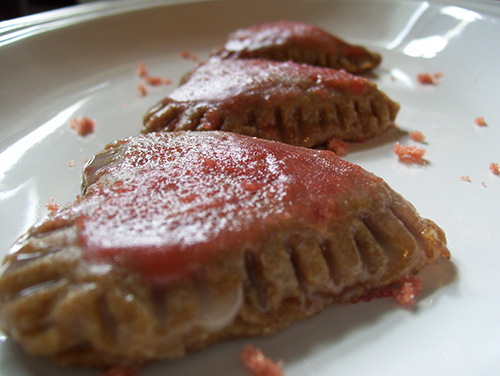
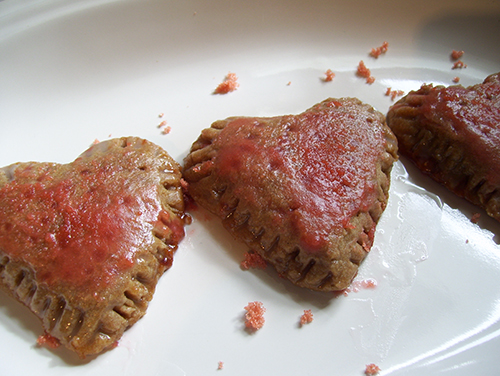
Day Fourteen and the final day of the Valentine’s Day Challenge is Mini Strawberry Heart Pies!


Happy Valentine’s Day Everyone! I hope you have tried out one of these recipes and are giving it to someone special on this day! I’m so happy to have completed this challenge and to have brought you fourteen days of vegan Valentine’s Day treats! It really goes to show that there’s nothing stopping you from going vegan because there is an alternative for everything, even chocolate!


If you’re running out to make a last minute Valentine’s Day treat, check out the other thirteen days of the Valentine’s Day Challenge for ideas:

Red Velvet Pancakes
Chocolate Peanut Butter Fudge
Coconut Cream Heart Patties
Raw Cranberry Coconut Truffles
Sweet Strawberry Sorbet
Strawberry Heart Shaped Cinnamon Rolls
Vegan Cherry Cordials
Peanut Butter Cups
Double Chocolate Cherry Brownies with Cherry Frosting
Marzipan Truffles
Strawberry Almond Shortbread Cookies

Thank you so much to everyone who has followed the fourteen day challenge and tried out the recipes! I really appreciate it.

- Alexis ♥


Strawberry Heart Pies
  • 1 ½ cups flour (I used all WW but I think you should do half and half)
  • ¾ cup vegan butter, frozen and diced
  • 1 tablespoon sugar
  • 1-3 tablespoons cold water (start with one and use more if needed)
  • ½ teaspoon salt

For the Filling
  • ½ cup strawberry preserves

For the Glaze
  • 1 cup powdered sugar
  • 1-2 tablespoons of non-dairy milk
  • ½ teaspoon vanilla extract

For the Sugar Topping
  • 1 tablespoon sugar
  • 1 drop of red food coloring (or more depending on what color you want)

Directions

Place the flour, sugar, salt and butter in the food processor and process it until the butter becomes pea sized. Add the cold water a tablespoon at a time and pulse until the dough just starts to come together.

Remove the dough from the food processor onto a flour surface and shape into a ball, do not over knead the dough. The point is to have pieces of butter in the dough and if you over knead it the butter will start to melt.
Refrigerate the dough while you preheat your oven to 350°F and prepare your fillings and toppings. The filling can be anything that you want so you don’t just have to use strawberry.

Flour your work surface and place the dough on it and roll it out until it’s a 1/8 of an inch thick.

Cut out whatever shape you desire and if you want hearts just use a heart shaped cookie cutter, when you have an even number of cut outs coat one side of your pie (this will be the bottom) in a little bit of water. The water will act like glue for when you seal the pies.

On the side that you coated in water, put in a teaspoon to a teaspoon and a half filling and place the other side of your pie directly over it where it lines up.

Gently pinch together both sides, making sure that you go every part because this will make sure no filling escapes.  If you want to create a more decorative look, use a fork to go over the seam again but make sure not to press too hard because it will tear the dough.  Using a fork or knife, poke holes in the top layer so that the steam can escape while they’re cooking. Place the pies on a greased cookie sheet and bake for 20 -25 minutes or until golden brown and crispy on the outside.

Remove from the cookie sheet and onto a cooling rack. When the pies are cool, cover them in the glaze and then sprinkle with the pink sugar for a nice decoration! You can eat these hot or cold. When eating them hot just cover them with the glaze and sugar immediately.

Enjoy!


Wednesday, February 13, 2013

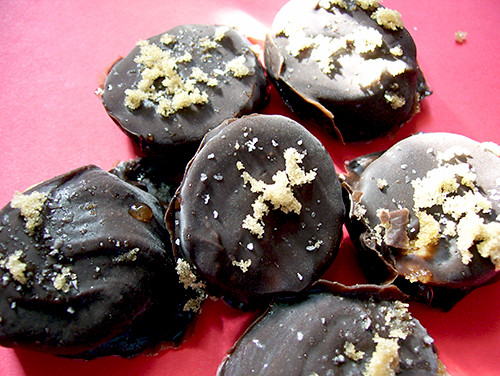
Day Thirteen of the Valentine’s Day Challenge is Frozen Chocolate Covered Banana Treats!


These are a quick treat you can do if you need something last minute and you forgot to plan anything. These taste like little bites of banana chocolate ice cream! These are a great alternative to the usual chocolate covered strawberries, especially if your significant other doesn't like strawberries!

image

The last day of the fourteen day challenge is tomorrow and I can’t wait! It’s been a pretty intense fourteen days, always worrying about what to make for the next day haha. I hope you guys enjoy the last recipe of the challenge; it’s pretty versatile and can definitely be used for days other than Valentine’s Day.

image


- Alexis ♥

Frozen Chocolate Covered Banana Treats
  • 2 Bananas, chopped and frozen
  • 1 ½ cups Vegan Dark Chocolate Chips
  • 1 Tablespoon Vegetable Shortening
Optional
  • 2 Tablespoons Brown Sugar
  • 2 Teaspoons Seal Salt or to taste
*I sprinkled mine with just a bit of brown sugar and sea salt. The salt is a nice addition to cut through the overall sweetness of the treat!

Directions

Chop up two bananas and freeze them in advance, this makes them easier to cover in chocolate.

Melt the chocolate with the vegetable shortening over a double boiler until smooth and set aside to cool before covering the bananas.

Dip the bananas in the chocolate and using a fork, pick them up and shake off the excess before moving to a container lined with parchment paper.

If using, sprinkle them with brown sugar and sea salt and then place them in the freezer until eating.

Enjoy!

Tuesday, February 12, 2013

Day Twelve of the Vegan Valentine’s Day Challenge is Baked Vanilla and Chocolate Mini Doughnuts!


These were so easy to make and so much fun to decorate! I didn't have sprinkles on hand so that’s why there were none but if you have some valentine’s themed ones they would work so well on these! The recipe is the same as my other baked doughnut one minus the added spices. For the chocolate doughnuts you just add some cocoa powder and I might try some melted chocolate next time when I have more around.  I hope you try these out and have fun decorating them!


Today would have been my mom’s 53rd birthday if she hadn't passed away three years ago so I just wanted to take some time out to wish her a happy birthday wherever she is in the world! I’m sure she would have loved this blog and the many sweets I have been making!


As always, click read more for the recipe! :)

- Alexis ♥

Baked Vanilla and Chocolate Mini Doughnuts
  • 1 ½ cups flour
  • 1 ¼ cups sugar
  • ½ cup cinnamon applesauce
  • ¼ cup butter
  •  ¼ cup vegetable oil
  • 1 teaspoon Vanilla Extract
  • 1 ½ teaspoons baking powder
  • ½ teaspoon apple cider vinegar

For the Chocolate Doughnuts:
  • 2-3 Tablespoons Cocoa Powder

For the toppings:
  • ½ Cup Melted Vegan Chocolate Chips + 1 teaspoon Vegetable Shortening
  • ½ cup powdered sugar (for the powdered doughnuts)
  • 1 Tablespoon of Shredded Coconut

Optional
  • Sprinkles
  • Cinnamon Sugar

For the colored icing:
  • 1 cup powdered sugar
  • 1-2 Tablespoons Non-Dairy Milk
  • 2 teaspoons Corn Syrup
  • 1 teaspoon Vanilla Extract
  • Vegan Food Dye (the gel or paste kind)

*I split this into three bowls and left one white for the glazed doughnuts and used vegan food dye to make the pink and the red colors.

*If you use a non-gel or pasta food dye the consistency might change but you can just add more powdered sugar if it’s too thin or more milk if it’s too thick. Totally up to you!

Directions

Preheat your oven to 325° F

Sift together the flour, baking powder, salt and set aside.

Beat together the butter, applesauce, apple cider vinegar, vanilla extract and oil and then slowly add the dry ingredients, a cup at a time, until fully incorporated.

Split the batter evenly in two and add your cocoa powder to one of the batters. If you want you can color the white batter to make it a little more valentine’s day themed.

Butter or oil the pan you plan on using and pipe in the batter to fill the circle shape. (You can just use a zip lock bag with the corner cut off. Try not to overfill the pan.

Bake for 8-9 minutes or until the doughnuts start to spring back.

It’s important you don’t cook these too long or they will become dense and will be cooked unevenly.

Cool completely before covering in toppings and/or decorations.

Enjoy!

Monday, February 11, 2013

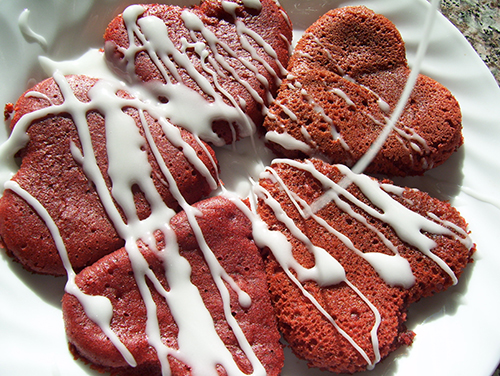
Day Eleven of the Valentine’s Day Challenge is Vegan Red Velvet Pancakes!


To make the heart shape you just need to use a heart shaped cookie cutter or free hand it! There are only a couple of days left until the end of the Vegan Valentine’s Day Challenge, its crazy how much baking I've done over the past almost two weeks! I really hope you guys have enjoyed the recipes as much as I have in making them!

If there’s anything else you want to see on the blog please just let me know! I am open to any suggestions you guys have.

- Alexis ♥

Vegan Red Velvet Pancakes
  • 1 ½ cups flour
  • 1 ½ cups milk
  • 1 Flax Egg (1 Tablespoon flax meal + 3 Tablespoons warm water)
  • ½ cup Sugar
  • ¼ cup Vegan Butter
  • 3 Tablespoons Cocoa
  • ½ Tablespoon Vegan Red Food Coloring
  • 1 ½ Teaspoon Vanilla Extract
  • 1 Teaspoon Baking Powder
  • ½ Teaspoon Baking Soda
  • ½ Teaspoon Salt
Glaze
  • 1 cup Powdered Sugar
  • 1-2 Tablespoons Non-dairy Milk
  • ½ Teaspoon Vanilla Extract
Directions

Mix together your flax seed meal and water and set aside until it becomes gelatinous.

Sift together your dry ingredients the flour, cocoa, salt, baking powder and baking soda and set aside.

Cream together your butter and sugar until light and fluffy and then beat in the flax egg, vanilla extract, red food coloring and milk. 

Slowly add your dry ingredients to the wet ones until combined, its okay if there’s lumps. Be sure not to over mix the batter.

Heat a non-stick pan or griddle with a nonstick spray or butter on medium heat. Using a ¼ - 1/3 cup measure add your batter to your pan, using the measuring cup to spread out the batter. Reduce your heat to medium low and flip when you see bubbles starting to form around the edges of the pancakes. Cook your pancakes for 2-3 minutes or until golden brown on both sides. Before moving onto your other pancakes, be sure to wipe your pan off and add a little bit more spray or butter.

For the Glaze

Whisk together the powdered sugar, vanilla extract and milk until its well combined and then drizzle over the red velvet pancakes.

Enjoy!

Sunday, February 10, 2013

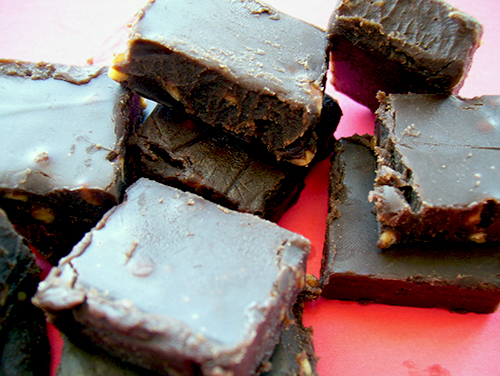
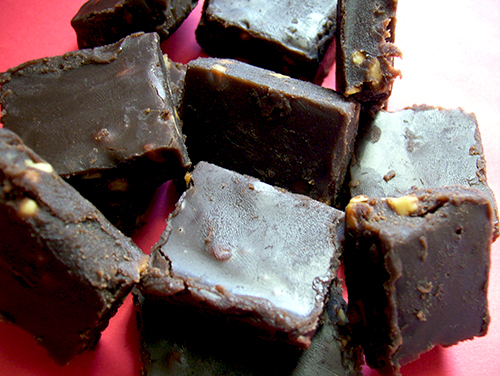
Day Ten of the Valentine’s Day Challenge is Chocolate Peanut Butter Fudge!


This recipe pulls together really quickly and the only wait time you have is waiting for it to harden which can take as little as 20 minutes. Try using a crunchy peanut butter in this or throwing in a handful of chopped nuts for some nice texture. They taste like a peanut butter cup and it perfectly melds together the flavors so you don’t suffer from an uneven ration of peanut butter to chocolate. Just package these in a quick heart shaped box and you have an awesome Valentine’s Day gift!


After the Valentine’s Day Challenge, I have a ton of savory recipes coming up that I hope you like! Definitely going to give the sweet desserts a break for a week or two because preparing for a fourteen day challenge leaves you with tons of baking to do and leftover sweets! I can’t wait to take a little breather from the endless planning and baking but it has been fun though.


- Alexis ♥

Chocolate Peanut Butter Fudge
  • 1 cup Vegan Chocolate Chips
  • ½ cup Peanut Butter (I used crunchy pb)
  • ½ cup Vegan Butter
  • ½ Teaspoon Pure Vanilla Extract
Directions

Combine the chocolate chips, peanut butter and butter in a small pot and heat over a medium low flame until completely melted and then mix in the vanilla extract.

In a parchment sheet lined container, pour in the chocolate mixture and smooth out the top with a spatula. Refrigerate until firm (this could take an hour or more).

Enjoy!

Saturday, February 9, 2013

Day Nine of the Valentine’s Day Challenge is Coconut Cream Heart Patties!


This is my little spin on peppermint patties! They’re actually really quick and simple but like I say in the recipe make sure you buy unsweetened coconut or else these will be sickeningly sweet! If you love coconut, you will love these though.


There was a ton of crazy snow out here in NYC yesterday but the people out here panicked so much because they’re still reeling from Hurricane Sandy. I’m okay with the snow but I definitely can’t wait until spring starts! I want warm weather soon!

- Alexis ♥

Coconut Cream Heart Patties
  • 1 cup Powdered Sugar
  • 1 cup Unsweetened Desiccated Coconut (this is important, definitely get unsweetened!)
  • 1 cup Vegan Chocolate Chips
  • 1 Tablespoons Vegetable shortening (for the chocolate)
  • 1-2 Tablespoons Coconut Milk
Optional
  • ½ Teaspoon Pure Coconut Extract
  • ½ Teaspoon Pure Vanilla Extract
Directions

Place all of the ingredients in the food processor and blend until it becomes a sticky dough and then wrap it in plastic wrap and refrigerate until it firms up a bit.

Melt the chocolate and shortening over a double boiler until it becomes smooth.

Meanwhile, take out your coconut dough and roll it out on a clean surface sprinkled with powder sugar.

You can do whatever shapes you want at this point or even make them into truffles but if you want the heart shape, use a cookie cutter to cut out the patties until you have no dough left.

*Tip: Before dipping them in chocolate refrigerate them for a little longer to firm up even more or else they will start to melt and break.

Have a container ready (make sure to sprinkle the bottom with powdered sugar) and using a fork dip the patties into the chocolate and shake off the excess before moving to the next one.

After you’re all done, refrigerate them until they’re set.

Enjoy!!

Friday, February 8, 2013

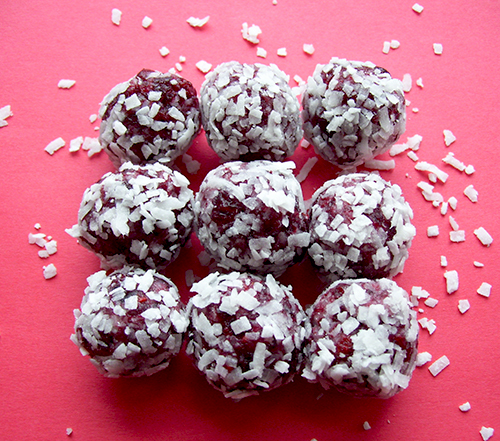
Day Eight of the Valentine’s Day Challenge is Raw Cranberry Coconut Truffles


This is another healthier dessert for Valentine’s Day and one that you can mix and match to suit your tastes! I didn't use dates because while they taste so good you can get tired of them so I wanted to switch it up and use cranberries and they worked just the same. The cranberries end up making it taste like cherry coconut! Just package these in a cute box and you have a healthy and raw Valentine’s Day present!


- Alexis ♥

Raw Cranberry Coconut Truffles
  • 1 cup Unsweetened Dried Cranberries
  • ½ cup Unsweetened Desiccated Coconut (plus ¼ cup to roll them in after)
  • 2 Tablespoons Raw Agave Nectar
Optional
  • 1 Tablespoon Cacao Powder
  • ¼ cup chopped nuts
  • ¼ Teaspoon Pure Coconut Extract
Directions

Process everything in the food processor until it comes together to create a sticky dough.

Shape the dough into equal sized balls and roll them in the extra coconut.

Enjoy!

Thursday, February 7, 2013

Day Seven of the Valentine’s Day Challenge is Sweet Strawberry Sorbet!


This is a quick and healthy dessert you can make when you’re on the go and really want to treat your significant other to something sweet! I wanted to feature some healthier desserts for Valentine’s Day and this is one of them! It features no refined sugar as it only uses a bit of agave for extra sweetness. To make this dessert a little more decadent top it with a drizzle of melted chocolate or something coconut whipped cream. I hope you enjoy this simple and easy recipe!


- Alexis ♥

Sweet Strawberry Sorbet
  • 2 cups chopped strawberries, frozen
  • ½ cup non-dairy milk
  • 2 tablespoons agave
Directions

Place everything in a food processor and blend until smooth.

Transfer it to a freezer safe container and freeze until it firms up and enjoy!

Wednesday, February 6, 2013

Day Six: Vegan Strawberry Heart Shaped Cinnamon Rolls!


Day Six of the Valentine’s Day Challenge is Vegan Strawberry Heart Shaped Cinnamon Rolls! These are a cute twist on the ever popular cinnamon roll which can be made with the strawberry filling like I posted or the more traditional cinnamon and brown sugar filling. The heart shape is so easy to make and takes only a second. I know the recipe may look daunting at a first glance but that’s only because I wanted to explain each part of the process as clearly as possible so you could understand.  The hardest part is waiting for the dough to rise!


These adorable cinnamon rolls would be a great breakfast treat for the ones you love! I hope you enjoy them!

- Alexis ♥

Strawberry Heart Shaped Cinnamon Rolls
  • 3 cups flour
  • 1 flax egg (1 tablespoon flax meal + 3 tablespoons warm water)
  • ½ cup non-dairy milk
  • ¼ cup vegan butter
  • ¼ cup sugar
  • ½ teaspoon salt
Yeast Mixture
  • 1 package yeast (2 teaspoons)
  • ½ cup warm water (around 110°F)
  • 1 teaspoon sugar
Filling
  • ½ cup strawberry preserves
  • ½ cup fresh strawberries, chopped
  • ¼ cup vegan butter, softened (not completely melted)
  • 1-3 tablespoons brown sugar
  • 1 teaspoon cinnamon
  • ½ teaspoon vanilla extract
Strawberry Glaze
  • 1 cup powdered sugar
  • 2 tablespoons milk
  • 2 tablespoons strawberry preserves
  • ½ teaspoon Vanilla Extract
Optional
  • Vanilla Extract for the glaze
  • Pink Food Coloring for the glaze
  • ¼ cup brown sugar to sprinkle over the top of the rolls before baking
Directions

Mix together the flax meal and water and set aside until it becomes gelatinous.

Mix together the ingredients for the yeast mixture and set aside for 10 – 15 minutes to let the yeast bloom (this just means it will start to bubble which is a sign that your yeast is alive).

In a small pot, combine the sugar, milk and vegan butter on a low flame and cook until the sugar has dissolved and the butter has melted. This mixture shouldn’t boil and should be cooled before adding to the flour so you don’t kill the yeast.

In a large bowl, add the flour and salt and then with a wooden spoon mix in the flax egg, yeast mixture and cooled butter mixture and mix until it starts to form dough. It will look rather raggedy and much like it won’t become dough but this is where you turn it on onto a floured surface and knead for 8-10 minutes until it becomes smooth and elastic.

After you’re done kneading the dough, place it in a bowl covered with a damp kitchen towel or plastic wrap and let it rise for two hours or until the dough has doubled in size.

When it has risen, roll it out into a rectangular shape about a ¼” inch thick and brush with the softened butter. In most cinnamon roll recipes they will tell you to leave at least an inch border between the filling and edge of the dough but don’t do that here. Spread the strawberry filling across the entire surface and slice in long strips. THIS WILL BE MESSY! I know the filling will be liquidly and seem like it won’t work at all but trust me it will! Try to keep as much of the filling in the cinnamon roll as possible when rolling it and the extra filling that has seeped out will be spooned over the top of the cinnamon rolls.

To make the heart shape: Instead of just rolling from one side like traditional cinnamon rolls evenly roll in both sides until they meet in the middle and there you have a heart shape! Simple as that!

Lay the cinnamon rolls flat in a greased baking dish and let them rise again for another 45 minutes. (If you plan on making them the next day, after rolling them you can cover them in plastic wrap and let them rise overnight to be baked the next morning.)

Meanwhile, preheat your oven to 375°F.

Once your cinnamon rolls have doubled in size once again bake them for 18 -25 minutes or until golden brown.

After baking, let them cool for 2-5 minutes before topping with the strawberry glaze.

For the glaze

Whisk together the powdered sugar, milk, strawberry preserves and pink food coloring if using and whisk until it becomes a smooth and creamy mixture. If you prefer a thicker consistency, use more powdered sugar.

Tuesday, February 5, 2013

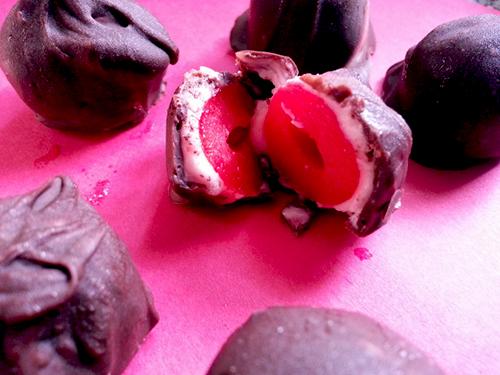
Day Five is Vegan Cherry Cordials!


Day Five of the Valentine’s Day Challenge is Vegan Cherry Cordials! For those who don't know, cherry cordials are chocolate covered cherries. I used to love cherry cordials so I was so excited to make these! They’re a little time intensive and require that you think ahead but the end result will be amazing.

image

I’ve been baking a lot of bread lately, things like bagels and garlic knots are in the works so if you’re looking for a good vegan bagel recipe check out: the wicked good vegan!

- Alexis ♥

Vegan Cherry Cordials
  • 1 10 ounce jar of maraschino cherries
  • 2 tablespoons vegan butter
  • 1 ½ cups powdered sugar
  • 1 cup Vegan chocolate chips
  • 1-2 tablespoons cherry juice
  • 1 teaspoon corn syrup
  • ½ teaspoon almond extract
Directions

In advance, drain the maraschino cherries (reserving some of the cherry juice) and dry the cherries as much as possible before beginning this recipe. (I recommend freezing them before covering in the powdered sugar mixture/)

Beat together the butter, one cup of the sugar, almond extract, corn syrup and cherry juice until well incorporated and then add in the leftover ½ cup of sugar and knead until it becomes soft dough. If the dough is too sticky add more powdered sugar.

Refrigerate the dough until ready to use.

Once your cherries and dough are ready wrap each cherry with the dough and roll it out in your hand to smooth it out into a ball. If your dough isn't firm enough, roll the cherries in it and then freeze it for an hour or two. Once you’re done freezing it, roll the dough covered cherries in your hand to smooth into out into a nice smooth ball. Freeze the cherries until nice and firm.

Melted the chocolate over a double boiler and let it cool a bit before covered the cherries. Make sure you have a station set up to cover the cherries because they tend to start melting very quickly so you have to cover them in chocolate as quickly as possible. (I did two or three at a time and then put the cherries back in the freezer to chill more and repeated this process until all the cherries are covered.) I used a fork to roll them in the chocolate and then let the excess drain before transferring to my container for the cherries.
After you’re done covering all of the cherries, freeze them until they’re set and then transfer to the refrigerator until ready to eat!

*Tip: Make sure you completely cover the cherries or else the filling will start to leak out. I suggest covering them in chocolate once, letting them freeze and if they’re not completely covered, cover them in chocolate again.

*Tip #2: The longer you let them sit, the more the inside will turn to liquid like a traditional cherry cordial. They taste amazing either way though!

Monday, February 4, 2013

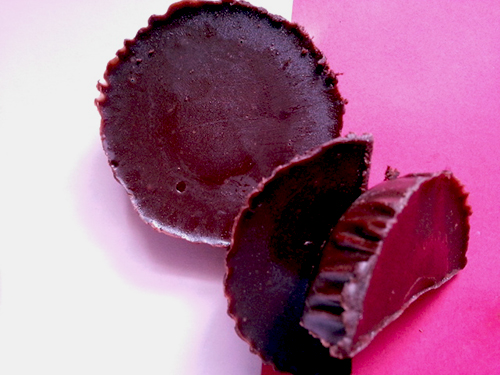
Day four of the Vegan Valentine’s Day Challenge is: Vegan Peanut Butter Cups!


Day four of the Vegan Valentine’s Day Challenge is: Vegan Peanut Butter Cups! These are actually super easy to make and taste just like the real thing! The last few posts are all chocolate treat based because they can all become a cute little chocolate box for whoever you plan on giving a present this valentine’s day. I hope you give them a try and enjoy them!

image


- Alexis ♥

Vegan Peanut Butter Cups
  • 2 cups Vegan Chocolate Chips (you might need more depending on the size of your peanut butter cups)
  • ½ cup peanut butter
  • ½ cup powdered sugar
  • ½ tablespoon vegan butter
  • 1 teaspoon Vanilla extract

Directions

Beat together the peanut butter, powdered sugar and vanilla extract until it becomes a smooth dough and refrigerate until using.

While your dough is in the refrigerator, melt the two cups of vegan chocolate chips and butter over a double boiler until nice and smooth and then set aside to cool down just a little.

Remove the dough from the refrigerator and separate it into equal sized balls; the amount is up to you but I had done about a teaspoon each and thought it was too little for the overall peanut butter cup.

Using a cupcake or muffin tin that has been greased, pour in the melted chocolate to about a 1/4 “ or 1/8” inch thickness and then press in the peanut butter balls and proceed to add more melted chocolate until it covers and evens out over the peanut butter.

Repeat until you finish your desired amount of peanut butter cups and freeze for one to two hours or until they are set.

Enjoy!

Sunday, February 3, 2013

Double Chocolate Cherry Brownies with Cherry Frosting!


Day three of the Vegan Valentine’s Day Challenge features Double Chocolate Cherry Brownies with Cherry Frosting! The frosting is of course optional but tastes delicious. I will have some healthier Valentine’s Day treats coming up soon; even I get tired of all the sugar! Plus, it’s okay to indulge sometimes but not all of them!

I've been hard at work endlessly baking for this fourteen day Valentine’s Day Challenge and of all things doing my own little crafts for the day as well. Sometimes it’s so much better to create something special and meaningful to give to someone rather than just buying some store bought hallmark card and candy. I’m sure there are more than a few people out there that don’t agree with the whole commercially exploited Valentine’s Day (which I agree that it is) but there’s nothing wrong with showing your significant other how much you love them on this particular day as long as you show them on other days as well!

I hope you’re all having an amazing week! :)

- Alexis ♥

Double Chocolate Cherry Brownies with Cherry Frosting
  • 2 flax eggs (2 tablespoons flax meal + 6 tablespoons warm water)
  • ¾ cup flour
  • ½ cup Vegan Chocolate Chips, melted
  • ½ cup unsweetened Cocoa Powder
  • ½ cup brown sugar
  • ½ cup chopped maraschino cherries
  • ½ cup walnuts, chopped
  • 1/3 cup vegan butter
  • 3 tablespoons water
  • 3 ½ teaspoons cherry juice
  • 1 teaspoon vanilla extract
  • ½ teaspoon baking powder
  • ¼ teaspoon salt
Frosting
  • 2 cups powdered sugar
  • ½ cup vegan butter
  • 10 teaspoons cherry juice (if you have cherry extract use 1 teaspoon or more and vegan food coloring for color)
Directions

Preheat your oven to 350°F.

Whisk together your flax meal and water and set aside to thicken.

Beat together butter and sugar until light and fluffy and then beat in the flax eggs, vanilla extract, melted chocolate and cherry juice.

Sift together all of your dry ingredients and then add them into the wet ingredients, a cup at a time, until everything becomes well combined (this will be a thick and sticky batter). Fold in the cherries and chopped nuts and beat in the three tablespoons of water if the batter is especially thick.

Transfer your batter to a greased pan and bake for 30 – 45 minutes or until the brownies set.

Let them cool completely before frosting.

For the Frosting:

Beat together the powdered sugar, butter and cherry juice until well combined. If you feel the frosting is too thin, add more powdered sugar.

Enjoy!

Saturday, February 2, 2013

Marzipan Truffles Two Ways: Covered in Dark Chocolate and Double Chocolate


Day Two of my Vegan Valentine’s Day Challenge is Marzipan Truffles Two Ways: Covered in Dark Chocolate and Double Chocolate! After making the strawberry almond shortbread cookies that reminded me so much of marzipan, I decided to make some marzipan! These are delicious little bit sized chunks of chocolate covered marzipan that are so sweet but intoxicating haha. I really hope you enjoy them!

image

- Alexis ♥

Marzipan Truffles Two Ways: Covered in Dark Chocolate and Double Chocolate
  • 1 ¾ cups raw almonds
  • 1 ½ cups powdered sugar
  • 5 tablespoons corn syrup
  • 1 teaspoon almond extract
  • 1 cup vegan dark chocolate chips
For the Double Chocolate:
  • 2 teaspoons of Unsweetened Cocoa Powder
Optional (For decorating):
  • Sprinkles
  • Cocoa Powder
  • Coconut
Directions

In a food processor, grind the almond until they’re very fine and start to clump together and then add the sugar and process until well combined.

 Transfer the almond sugar mixture to a bowl and add in the corn syrup and almond extract and knead (with gloves) until it comes together to make a dough. Shape the dough into a log and cut in half.

 Take one half of the dough and knead in the two teaspoons of cocoa powder.

Shape both sets of dough into a ball, cover in plastic wrap and refrigerate or freeze until firm.

While the marzipan is firming up, set up your decorations stations and melt the chocolate with a double boiler (let it cool a little bit before covering the marzipan with it).

Once the Marzipan has firmed up separate both sets of dough into equal sized balls, about a half tablespoon to a tablespoon, these will be sweet so smaller portions will be good.

Using a fork, roll the marzipan truffles into the chocolate and shake off the excess when lifting. You can decorate these however you want by just rolling the non-chocolate covered marzipan in the sprinkles, coconut, etc.

Once you’re done covering all of the marzipan in either the decoration or the covered them in chocolate refrigerate them so the chocolate can set.

Enjoy!

*Tip: If you want these to work at room temperature, temper the chocolate. I didn’t do this because I have yet to master the art!

Friday, February 1, 2013

Valentine's Day Challenge Day 1: Strawberry Almond Shortbread Cookies!


The Vegan Valentine’s Day Challenge begins with Strawberry Almond Shortbread Cookies! If you love marzipan you are going to LOVE these cookies and they’ll make great homemade gifts! I also love the fact that there are only six ingredients and they’re all easily accessible and most people already have lying around. You should definitely try these out and if there's any sweets you want me to try out let me know!

image


- Alexis ♥

 Strawberry Almond Shortbread Cookies
  • 2 cups flour
  • 1 cup butter
  • 2/3 cup sugar
  • 1 teaspoon almond extract
  • ¼ teaspoon salt

Filling
  • 1 cup strawberry jam
  • ¼ teaspoon almond extract

Directions

Preheat your oven to 350°F

Beat together the butter, sugar and almond extract until light and fluffy and then add in the dry ingredients a cup at a time until fully incorporated and starts to form a ball. Chill for an hour or until firm.

After letting the dough chill, flour your work surface and roll out until it’s a ¼” inch thick. Using a heart shaped cookie cutter cut out as many cookies as you want, re-rolling out the dough as needed.

When you’re done cutting out the cookies, using any utensil you can draw with that’s not sharp (I used the rounded end of metal chopsticks) create an outline of a heart and then use your fingers to create a deep enough hole to fill it with the jam. Using a ziplock bag with the edge cut off, pipe the jam in the heart wells you created, making sure not to overfill it.

Bake the cookies on an ungreased cookie sheet for 15-18 or until the edges start to turn a golden brown.

Let cool on a wire rack and enjoy!